Monday, April 7, 2014

Spring Card

Hello Friends!

It's Katy here and today I am sharing a spring card I made.  Spring is such a pretty time of year!  So I used the bare tree as a focus point on this card.  For the little buds I used Flower Soft Sweet Pea.  Using gel medium, I adhered the Flower Soft to the tree.


Here is a close up of the tree.  I put a little walnut distress ink on the trunk to darken the edges a little.  I like that you can see the grain and giving the tree a little extra "oomph."  :)


And if you like challenges?  There is one going on right now here at Unique Laser Designs.  Check it out here!


Sunday, April 6, 2014

Easter Basket

Hi there, Michelle here to share with you a festive Easter basket that can be used a fun center piece on your Easter table. 

 But first here's a little about me.


 I live in Oregon with my Husband and our two daughters.  A life long crafter, I started paper crafts about 11 years ago and have been addicted ever since.  I hope you will be inspired by my creations that I share here with Unique Laser Designs.

Now lets get to the fun stuff..


I made this cute centerpiece for Easter using some great pieces from ULD.


Aren't they gorgeous just as is?  You could leave these just as is, or you can embellish them in a number of ways.


Here's one of the bunnies after I covered it in gold glitter.   They remind me of the gold wrapped bunnies we used to get in our Easter baskets as kids.  To achieve this look I covered the entire surface with glue and then covered with gold glitter.


The Happy Easter I painted white first then covered with glue and white glitter.  

Don't forget Unique Laser Designs is hosting a challenge for April.  Enter a project created with ULD product for a chance to win, or if you don't have ULD product there is a category to enter without ULD product.  Click here for more details.


Thanks for looking!


Saturday, April 5, 2014

Words & Stars

Hi there Unique Laser Design Fans, it's Heidi here and this is my first post to share with you as part of the design team.  

I have a step by step tutorial of how I created this layout using the gorgeous word "Fabulous" and the mixed sized stars.


STEP BY STEP INSTRUCTIONS

1.  Get your Gesso and Brayer out

2.  Using your Brayer apply some Gesso to     your base page and allow to dry.

3. Choose which ULD Wood items you want to use and 
paint of your choice.  I have found using a sponge paint brush works really well.  Apply a thin coat over the Wood Items and allow to dry.

4.  Next I applied some Faber Castle Gel 
Medium to the ULD Wood items, you can see from the picture the difference
between the one with the Gel Medium on and the one without.  it just gives it a nice glossy look.

5.  Arrange your photo's on the dried Gesso and trace around them so you know where they will be placed.

6.  Using a Neon Colour II Crayon (which is a water colour crayon which are soft enought to smudge with your fingertips) - colour around the traced area.

7.  Apply water to a paint brush or your finger and blend the crayon.  Allow to dry

8.  Using the brick mask and some texture paste add some random sections on the page to add some gorgeous texture to your layout.

9.  Here you can see the texture which the brick mask gives you.  Allow to dry completely

10.  I added some Neon Color II Black on top of the Texture Paste.

11.  Add some washi tape here and there.

12.  Last but certainly not least add some paint splats.

13.  Adhere your photo's down as well as your Title and Stars and add any other embellishments you like.


The products used on my layout can be found at Unique Laser Designs store under wood Mini's and Words.

Happy Scrapping


Friday, April 4, 2014

Mixed Media Wooden Tag

Hello Friends!

My name is Katy, and I am apart of the Design Team here at Unique Laser Designs!  It is so exciting to be apart of something so new!  And you too get to be apart of our new adventure!


First, let me tell you a little bit about me.  I am happily married, and we have a wonderful son.  We also have 3 fur babies (cats).  I enjoy making layouts, cards, tags, mixed media projects, and whatever else I can use paper and embellishments on.  I am beyond excited to be apart of the Unique Laser Design Team.  And I hope that my projects along with my team's projects inspire you.  :)

So let's get to it!  This is my first project for ULD.  I used a Wooden Tag, Border Swirl I, small Music Notes.

I used gesso over the wooden tag.  Then I heat embossed the image in the middle.  Because it's wood it didn't warp or do anything weird (yay!)  Then I covered it (masked it) and painted around it.  I stamped on the right side of it.  The stars were done with light modeling paste and a stencil.  At the bottom are rub-ons.  I glued the swirl and just left it raw.  Using silver paint, I painted the notes.  

And then I glued a little jar to the right corner.  I made a sweet little bouquet!  This adds a little weight but because the tag is made out of wood, it's supported.  


And did you know there is a challenge?  That's right!  But you don't have any of these great wood products?  Hmmm--That's ok!  There is a challenge for you too!  So go check it out.  All of the rules to the challenge and prizes (yay! prizes!) are here.  

I can't wait to see what you create!


Thursday, April 3, 2014

Easter Wishes

Hey there 
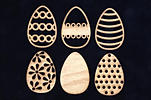
Unique Laser Designs fans and fans to be! It's Kisha here with my very first post that I'm super excited to share.  Easter will soon be among us and I figured what better time to share what I created using ULD's wooden eggs.


These cards were so much fun to create and as simple as the design ended up being, the look of them are just as lovely as a heavily embellished card.  I colored each egg by first giving them each a coat of gesso to guarantee a vibrant coat of color.  After drying the gesso, I began using various spray mist to color each egg and the final step was to add some clear embossing powder to give it all a shiny look.


This card I love so very much! To give this egg (or any of the designs) the multi color, just cover each section with cardstock to protect the area you don't want to color.  Then continue this process until you have achieved the look you're trying to achieve.


The blue egg shown here was still a bit to similar to the other eggs I distressed, so I decided to add a bit of stickles to make it stand out a little more.  And all the same this card will work well as a masculine card.


And for my final card I just had to add some pearls, this egg was screaming for pearls and it turned out so pretty.  There are so many different ways to create using these eggs, and they are not just for Easter.  They can very easily be used for baby shower invites/cards, expectant mother cards and kitchen decor.  Just step outside of that box and let your imagination run wild.

The products used on my projects can be found at Unique Laser Designs store under wood cutouts.

Until next time...Keep on creating!


Kisha

Follow Your Dreams......

Follow your dreams...

...and BE YOUrself!!

Lovelovelove Unique Laser Designs
and all of their wonderful product!..I am OHSOHonored to have been selected to be one of the Design Team members for April-July 2014! - Unique Laser Designs is based in California and specializes in laser-cut craft items, made from MDF....with new products being added regularly...there is always something NEW & fresh!
I took the ULD tags ( a wonderful cut of 3.5" x 6.6") and used mixed media techniques to attach this toooooooo cool Tim Holtz idea-ology cabinet card onto a vintage dictionary page with the word BELIEVE highlighted. The cut-out BElieve in YOUrself is also by ULD.
*******
And another tag:

Colored with Faber Castell Gelatos( OHMYGoodness...the YUMMYNESS!)...and paper pieced sailboat attached with mod podge.....The seagulls are also from ULD!
Soooooooooo many possibilities!!
Be sure to check out their shop!

I have another Design Team posty due on the 8th...where I will be showcasing more ULDproduct..it plays well with all the others!!

creative blessings,
debbie

Wednesday, April 2, 2014

Wishing for spring wreath


My wish...SPRING!
Oh spring, spring...where for art thou spring?

I created something springy and crafty last week, but it really didn't seem to have any effect on Mother Nature, so I'm trying again. This time, I'm making a wreath to grace the door and scare away the winter spirits.  And I'm using ADORABLE spring shapes from Unique Laser Designs!

First, I took a straw wreath and wrapped and wrapped it with this pastel variegated yarn.
Next, I took some canvas flower shapes from Linnie Blooms,  I colored them with gelatos (pink and orange), and spritzed with water so I could spread the color with my fingers.  On some of the flowers I added LOTS of color, some just a bit.  Some are more orange, some are more pink. A flowery hodge-podge!
Next, it's painting time!  I painted these ADORABLE Easter shapes and letters from Unique Laser Designs.


I "marble-ized" the solid egg and bunny by blending gelatos over the dried acrylic paint and then splattered the letters with pink paint after covering them with a few thin coats of Distress Stain Picket Fence.


This is my ode to spring.  Mother Nature are you listening this time?


I couldn't stop playing with these adorable shapes, so I'm tucking in a few more ideas if you get a few minutes to play.


Pin It