Showing posts with label atc blanks. Show all posts

Wednesday, July 2, 2014

Decorative ATC Cards

Hello ULD fans, Michelle here with a project that can be tweaked to anyone's style or decor.  I had a blast playing with these laser cut Artist Trading Cards from Unique Laser Designs, the possibilities of what you can create with these are endless.


The blank ATC's come in a set of 4.


Here's my set of 4 finished ATC's.  I got to play with some fun new products this weekend at a crop and this is what I ended up with.  


To get this look I started by spraying the ATC's with Dylusion's ink spray.  These ink sprays give vibrant colors and great coverage and worked great on the ULD product.


After the spray dried and used two different paint colors to add another layer of interest.


Next I added some texture using a product called Ferro, by Viva, it's the chunky gold stuff that I smeared over a stencil to get this look.


Then I used a different stencil and a pigment marker to add some interest on top of the gold Ferro.  Then I fussy cut the flowers from a wide piece of lace I had.  


I think the best part is that you can do what ever you want with these ATC's.  I love how they look placed in a square like this for a wall hanging.

Thanks for looking!


Thursday, June 5, 2014

Mini Embellishments

Hello, Kimberly here with a few mini embellishments.

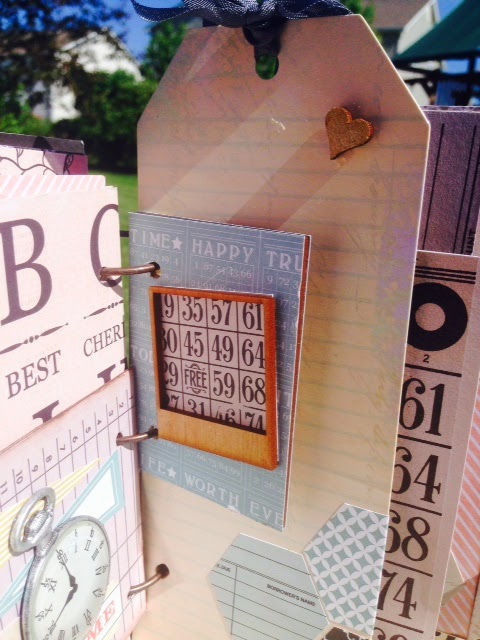
I love creating mini albums!  I also love mini versions of my favorite Wood Embellishments from Unique Laser Designs.  Did you know that most of their designs come in two sizes?  Yep.. perfect for my mini albums. 

Here are just a few mini albums and a few examples of where the mini embellishments came in handy.  I did use a few of the regular size embellishments.. so they are not all mini's.

4 recent mini albums where I added ULD embellishments.

See the golden bee sticking out behind the flower.

Hot Air Balloons.. not a mini but one of my favorite.

Mini feather fit perfect on a mini tag.

An ATC from ULD was covered then I added a
mini Polaroid. See the mini heart on the tag?

another mini Polaroid frame waiting for a picture

another feather and heart

love the mini scissors

Check out the page on the website featuring the MINI's.. I am sure you will find several that you want to add to your collection.  Mini's are perfect plain, painted, stamped on, colored, etc.. they are also perfect for any of your craft projects.  Check out more of this blog to find more creative ideas from other designers.  Have a great day!  Kimberly


Thursday, May 29, 2014

Some ART with ULD

HeyHeyHey....it's Debbie @ StudioBeeCreations
with another posty  using some of my most awesome collections from 
I have always been a sewer...loveloveloved making doll clothes from bits'n pieces given to me by my "Nana" who was a world traveller...then as a student in high school home ec..had to make a dress....Calico with a zipper!!...So, when I saw the dress forms from ULD, I knew I had to have it!


Stamp set from RedLead....painting inspiration from Stephanie Ackerman.{ I recently took an art class with her...OMG...gelli printing on deli paper!...whooot!}..I created this 8x8 "repurposed"canvas....#usewhatyouhave
.
I made the skirt with a piece of vintage feedsack & trim from my stash.
...and doodled all over....and over.
*******************
....and here are my ULD Artist Trading Cards.....
again using some RedLead rubber stamps....some 
ULD Birdie cut-outs and swirley-do's{for real...my go to for all my projects!}
********************************
LOVEEEEEEEEEEEEEEEEEEEE 
See you next time!

debbie/StudioBeeCreations

Wednesday, May 28, 2014

Little Cabin in the Woods

Hello Everybody!

Today I am sharing a fun project using ATC's, a polaroid frame and one of the wooden tags.  It is a little cabin.


I am going to give you the 360 degree tour and then show you how this came together.  Here is the front.   


Here is one side of the cabin.  The flower box is on the right.


Here is the back (and behind the scenes!) ;)


Here is the other side.


I gathered my supplies.  I had my 4 ATC pieces, wooden tag (at this point I didn't know which one), one of the smaller polaroid frames, glue gun, and pastes.  The smaller polaroid frame is the window.


Here is the roof put together.  For this I actually used Fabri Tac which was great but it seemed like a long time to dry.  It held together though, but I am impatient.  ;)


Before I can add the walls-I decorate them first.  The "wall" on the left has fiber paste on it.  The "wall" on the right has fiber paste also.  I used the brick stencil to push into the paste.  (Opposite of what you normally do with a stencil.)  I went over the mortar lines with a popsicle stick to make sure the outline is deep enough.  Since these ATC cards are made out of wood they take this paste very well.  No warping!


While these dry I started working on the roof.  This polka dot paper is from Making Memories.  I used a punch to punch out this shape. 


I painted the dried fiber paint with regular acrylic paint.  I did use black distress paint for the grey.  Then I used red and black for the brick color.


Here they are.  I glued the window (one of the smaller polaroids) to each wall and then glued the roof on top.  Then I used modge podge to glue on the shingles.


I used aluminum foil for the tree.  I took a sheet, folded it in half and then a little more.  I figured out by looking at it about how tall the tree would be.  Then I rolled it up tight.


Next, I embossed a brown sheet of cardstock with the tree embossing folder from Tim Holtz.  


Here's the tree trunk.  It is slightly bigger on the bottom which for a tree is perfect.


Here's the foil on the inside.


I used Tim Holtz's Garden Greens for the tree leaves.  I used different scraps just to give my tree a little variety.


Using my glue gun, I adhered the ends of the leaves to the top of the aluminum foil.  Then once it was all dry, I shaped the leaves by rounding out the stem.


I had the walls and the window and roof glued together.  But there were two big gaps.  On from the roof to the window and from the window to the ground.  So I found this light weight cardboard.  I cut it to size and did the same "wall treatment" as I did on the main walls.  This time I used a thinner coat of fiber paste. 


I used this material for the curtains but they needed something....


Worn Lipstick distress stain!


Here is the base.  This is the before and I forgot to take the after!  I used distress paint green shutters, olive, and mowed lawn distress ink on the tag.  The part that ribbon goes in is where I glued the tree with hot glue.


I trimmed and painted this piece of foam for the flower box.


I put a tea light in the cabin to make it have a nice glow.


Here is the cabin at nighttime.  :)


If you stuck with me to the end-Thank you!  I hope you are inspired to think outside the square!  Remember to come back tomorrow to see what Debbie has created!