Showing posts with label tag. Show all posts

Saturday, January 31, 2015

"Snow Days" Mixed Media Tag Using Unique Laser Design's "Snowman" Wood Embellishment!

We were hit with a couple of "snow days" earlier this week on the east coast. I decided to create a mixed media tag for my pocket scrapbooking layout to document the winter weather. 


"Snow Days" Mixed Media Tag


Started with an Avery Shipping Tag

Added Acrylic paint to my Gelli Plate

Used a Brayer to Gently Blend the Acrylic Paint

Placed a Textured Piece of Foam
(Face Down) on the Gelli Plate

Placed the Tag (Face Down) on
the Textured Foam

Textured Foam Stamped Image

Selected Unique Laser Design's
Snowman Wood Embellishment

Painted the Snowman with Golden
Iridescent Pearl Fluid Paint

Colored the Snowman's Arms with
a Bronze Sharpe. Colored the Hat & Outlined
all of the Edges with a Black
Uni-ball Signo Pen

Added 'Star Dust' Stickles
to the Body of the Snowman

Added Rhinestones for the Buttons

Distressed the Edges of the Tag with
Black Archival Ink

Pulled Some Pre-Painted Deli Paper Shapes
from my Stash

Folded the Circle Shape as Shown Above

Cut Different Shapes in the Circle to
Create a Snowflake
 

Adhered Piece of the Snowflake to
the Tag with Uhu glue and
Outlined with a Black
Uni-ball Signo (Broad) Pen

Lightly Painted the Snowflake with
Golden Titanium White
Fluid Acrylic Paint

Added White Cirles & Doodled Around
them with a Gray Inktense Pencil.
Added Neon Orange Zig-Zag
Stitching to the Left Side of the Tag

Added Additional Green & Blue Paint
Using Paint Pens. Used the Circle Stencil
(in the Previous Photo) to Stamp
a Pattern on the Snowflake.
Added Tim Holtz Alpha Stickers
for the "Snow Days" Sentiment

Added Aqua "Nail Bling" to
Accent the Top of the Tag &

Doodled Around the Edges

And Voila'!
"Snow Days" Mixed Media Tag
Using ULD's Snowman Wood Embellishment

Thanks for stopping by today. Please be sure to check out all of the amazing mixed media embellishments at Unique Laser Designs TODAY!

Much love,
Shelley

Thursday, January 15, 2015

Beautiful Tag

I love having tags on hand to add to presents instead of cards, and with all the little girl birthday parties I will end up going to I know this little beauty will come in handy to add to cute little gift we will give to the birthday girl.


I used the wonderful wood butterflies from Unique Laser Designs at the top of the tag.  They are just to cute and sweet and perfect for this little tag!  I love a plain look as seen below, but for this tag I wanted them to sparkle, but not too much.
http://www.uniquelaserdesigns.com/#!minis/c1qag


So I first pressed the wood into the embossing medium (like Versamark) to amek it "sticky" for the mica powders to stick.  I used a pale pink color to match the colors in the tag and just used a small dry paint brush to apply the powder to the sticky wood.


The shine and shimmer is just beautiful when it is done, it just catches the light perfectly, and it will not rub off!!  There is no drying time so to make these little shiny gems is super easy and fast too!!


Tags can be used instead of cards, so have fun making some tags for a change of pace!!

Supplies Used
Wood - Unique Laser Designs
Paper - Paper House
Stickers - Paper House
Mica Powder - Imagination Crafts
Cardstock - Kaisercraft
Ink - Prima & Tsukineko
Twine - American Crafts
Adhesive - Tombow
Trimmer - Fiskars
Enjoy!


Wednesday, November 5, 2014

A very sparkly season


Once Halloween passes, I head right into the sparkle. I don't forget about Thanksgiving, but while my mind is focused on being grateful, my hands are busy creating for the Christmas season.  And for me, this season gives me the go-ahead to sparkle sparkle sparkle.


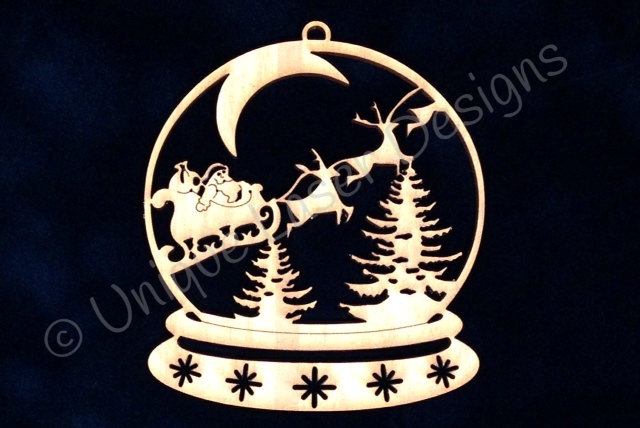
My first sparkly project of the season uses this wooden snow globe from Unique Laser Designs as the main focus of an over-sized tag. I spread a thin layer of Tacky Glue over the whole ornament (the end of a paper clip works great for moving the glue out of the intricate designs) and then sprinkled on a heavy load of ultra-fine platinum silver glitter. I added a red ribbon to the top too.

For the base of this tag (which is 4"x5"), I covered it in white cardstock and then punched out all different sizes and shapes of snowflakes from the same white cardstock and glued them on closely and randomly.  I even let some hang over the edge and then trimmed them later when I had the whole tag covered.  

I framed the edge with some black and white polka dot washi tape and added some die-cut trees that I "snow-swiped" with Picket Fence Distress Stain.  

I glued the snow globe to the tag along with some song lyrics and now this tag is a perfect addition to a simple hostess gift (maybe on a bottle of wine?).


Wishing you lots of crafty time as we begin these seasons of being grateful and being sparkly!

Monday, October 20, 2014

Give Thanks Tag

Happy Monday !

I finally had a quiet weekend, and had some fun playing with some old and new ULD goodies, stamps and sprays.

With fall in the air, I wanted to use some warm colors, and was inspired after watching a youtube video of an art journal that used pumpkins.


Wood Tags available on our Website
For this project, I used one of our wood tags, some wood pumpkins (coming soon !) and the words "Give Thanks" (also coming soon !)

I started by putting a coat of clear Gesso on the wood tag.  I wasn't quite sure what I was going to do on it, so coated it and set it aside to dry.
For the pumpkins, I used Heidi Swapp Color Shine sprays directly on the wood. Stalk was Citron and the body was Peach (although it looks more orange to me, but it has a gorgeous shimmer.)


I ended up using sprays on the tag too.  Several different colors:  Lindys starburst sprays - California Poppy Gold and Peony Scarlet Red.  Heidi Swapp color shine sprays - Citron, Mustard and Bronze.  I applied these randomly until I had the color scheme I liked.

I adore my script stamp and use it often. :)  (S4878 Old Letter Writing, by Hero Arts)  


 Next, I used some "green floral embellishments" that I got at Michaels.  I applied the same sprays to the green leaves, to give them more of a Fall feel.  (The sprays worked very well in altering the color from bright green to the more earthy tones.) 

I played around with placement, and then proceeded to glue down the pieces with Helmar Premium Craft Glue.


 I attached some green chiffon ribbon and called it done !

Don't forget to visit our website for lots more great items, and "Like" us on Facebook to keep up to date with new product releases, giveaways and more !

Thanks for visiting !
Shilo

Friday, October 17, 2014

Halloween Centerpiece

Hi there ULD friends!
Rachelle here, sharing a Halloween project created using
It's that time of year to have fun with pumpkins!
Take a look!

Pumpkin Centerpiece

 This is the beginning process. I decorated the pumpkins with glitter and sequins followed by wrapping the tops with green twine. Next apply black circles to the back which shows off the face. Then I painted bamboo sticks and attached to the back of each pumpkin and allow to dry.

Next, I decorated a painted tag with stickers, bows, pumpkin pin.
Here you can see the two small pumpkins and the tag.

 Here you can see the decorated pumpkin with sequins and twine.


I love how the glitter shows off. To finish off I simply took the sticks and applied them into the small styrofoam pumpkin.
You can get these great pumpkins from the Dollar Store.

 Finally I applied crinkled paper on top and around the pumpkin along with a couple of tags to finish the centerpiece.
There you have it!
I used these fantastic products:

 Halloween Carved Pumpkins (4pc Set)
Tags (3pc Set)
 
I really enjoyed creating this project using these fantastic products from
Unique Laser Designs and I hope you enjoyed it too!
 Thanks for stopping by today!
See Ya Soon!